
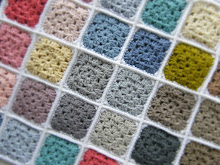
Hello my lovelies, nearly the end of another month. Just wanted to pop in today to upload this tutorial on how to join the Happy Flower Block in a JAYG (join as you go) fashion. Many people have messaged me, so I thought I'd spend a bit of time putting together something to help you visualise this method.
There are many JAYG tutorials out there, and to be honest as a self taught crocheter I've tended to (through trial and error) make up my own solutions to problems along the way. So this version is my version, and works just as well as any other. I've found it very easy to do, and I hope you do to!
That's what I love about crochet, although there are definitely tried and tested ways of doing things, it's very individual. If you find a method of doing something that works for you, then don't question it. Just because certain publications/magazines, bloggers, vloggers show you the way it could be done, doesn't mean it's the way it should be done.
Don't doubt your ability to be creative, and find your own solutions. Yes, the principles of crochet are firmly grounded, but once you've mastered the basic stitches, the possibilities are infinite. Just experiment and you never know where it'll take you. The main thing is to have fun with it, and enjoy the process.
My original pattern I worked a double crochet seam to join my squares, but this JAYG method is far simpler and to my mind just as effective. Especially if you're new to crochet. I hope the pictures and instructions make it easy to follow.
If you're starting this project from scratch then just start off by crocheting your first Happy Flower Block (pattern here). All seven rounds. Then the next block you do will only be to round six, round seven will now be your joining round (detailed below).


So did you try it???
Please do say hello......I love hearing from you
x x x x
Amazing tutorial, very clear! Thank so much for sharing. Have a lovely day! xxx
ReplyDeleteI appreciate your kind words xxx have a wonderful day too xxx
DeleteHave you ever tried a standing stitch? I was never a fan of the three chain, so very glad I learnt it. This is a great tutorial, well written and photographed.
ReplyDeleteHi Caroline, thank you for taking the time to leave a lovely message. I haven't tried the standing stitch no, but thank you for highlighting it to me. I have looked at it now, and will certainly give it a go. Any tips and advice are always welcomed. Kind regards, Sharron :)
DeleteVery easy to understand. I love your blog and your posts and check every day for updates. I was so excited today to see you posted a new one. Thank you for the encouragement. I do a different join than I've ever seen published to try and disguise the end of the round. I've been uncomfortable with it simply because I've never seen anyone else suggest it and figured I was "wrong." Your post encouraged me. Thank you
ReplyDeleteNow that's exactly what I hoped to achieve Jackie!! Thank you for letting me know your thoughts. There's nothing 'wrong' with doing things differently, as long as it works for you. If I only managed to encourage one person to be confident in their own ability that's more than enough for me! Your feedback has encouraged me to keep posting, so thank you for that..x
DeleteWonderfully well-explained tutorial and very helpful! Thank you!
ReplyDeleteHello Sandra, lovely to hear from you. Thank you for your positive feedback. Means a lot!
DeleteThank you for this detailed tutorial, so helpful and your words so encouraging!!!
ReplyDeleteMy pleasure! I appreciate you taking the time out of your day to share a thoughtful message!!
DeleteThank you so much for this wonderful post! I have a huge pile of squares which is almost up to how many I want it to be in total. I have just very recently 'allowed' myself to think about maybe learning JAYGO, & your amazing photos have given me the courage to finally try this method (after wondering about it for so long). Your post is so clearly detailed; your time is much appreciated !!!
ReplyDeleteHey NYC, so fantastic to hear you have a project just waiting to be joined. I do hope you can utilise my tutorial, and it works out well for you. Thanks for stopping by to share your thoughts with me. It makes the time spent putting this together worthwhile.
DeleteOops forgot to read the instructions as I was too busy drooling over your colour choices! Will definitely give it a try as it looks like a lovely flat join, thanks for posting x
ReplyDeleteYou're most welcome Miss Bluebell, I'm glad you were distracted by the colour combinations I've chosen :)
DeleteHello Sharron. I am glad you revisited the Happy Flower Block. Last Spring your gorgeous afghan inspired me to work up some "hydrangea squares" for a small throw. I pulled them all out this morning, and I need to make two more squares then decide on how to join them. I've been intimidated by the join-as-you-go method. I rather like the stitched join on your own "hydrangea" cushion---in your side bar with the 3-button closure. However, if I take time to add a white final round to each square, it will give me a larger throw and a pleasing finish as well. Decisions, decisions! Alexine in Maryland
ReplyDeleteGod Bless You! I have been looking for this for quite a while. I was directed here with the crocheted jar covers and you are quite a find...I saw this JAYG and was so very happy...I have found others but they just weren't right. As you say above, I had figured out a way to join some mandala type circles as I went because I didn't want to have to join them all later (ugh, I hate doing that, I mean if you're done with your project you should be done!!!) Anyway, I see such lovely things here I know I will be back. You do wonderful work with your things and thank you for sharing!
ReplyDeleteYou are amazing! I love your unique work, so neatly done and colorful. I have been searching for this jayg for a while now. I've seen others but just not the same. I love the look of this one and it creates such a neat corner! You are right, years ago I was starting a blanket from mandala type circles and just hate joining all the pieces together at the end, I mean, when you are done with a project you should be done!!! I figured out how to join them as I went - if there's a will there's a way. But you have saved me so much time! God Bless you for sharing your techniques.
ReplyDeleteperfect tutorial - thank you! Also, love the colorway, could you tell us a little more about the yarn colors and sizing? I'm guessing it's DK weight (i'm in US and always wishing I could grab it easily!)
ReplyDeleteThank you so very much for a superb tutorial. I can see you are a very good teacher. I will definitely be making this throw. Much love and greetings from a wintery Durban, South Africa. Vera Stewart
ReplyDeleteI LOVE this blanket!! Don't know if I'll get around to making it, but it's BEAUTIFUL!!!
ReplyDeleteThere's just something about your use of colors that is wonderful - Love it!!!
ReplyDelete